Bulk resizing and reformatting of pictures in an easy and fast way

I went to a BBQ yesterday and took some pictures with my cheap 10 Mpx camera.
This resulted in some nice pictures I’d like to share with friends. (not trough facebook, tough)
The problem of today’s Mpx-hype is that pictures are two to three times bigger than my computer screen.
A .JPG picture of Width: 3648 pixels and Height: 2736 pixels results in a 4.8MB file.
One night of pictures can take several Gigabytes.
The problem of this is when you want to upload them to the internet, or you want to mail them to some friends, they’ll take too much bandwidth or eat your download-limit.
When not using picasa, flickr or facebook or some sort of internet service that is.

So for resizing all the images to something more reasonable, we could use The Gimp with the batch function (included in the gimp-plugin-registry package)
But as these are a lot of large images this would simply take too long as each picture has to be opened/displayed.
Instead I recommend the ImageMagick (set of) program(s) to edit all the pictures at once.

Use the mogrify program to resize images and replace the originals. If you like, you can also change the format (extension) while doing so.
If this is the first time you play around with the ImageMagick programs, you might want to make a backup as you could damage your files irreversible.

Go to the directory where the pictures you want to resize are located.

cd ~/Pictures/TestPictures/
mogrify -resize 40% *.jpg

This will resize all files ending on .jpg to 40% of their original size. Note that the original files are replaced!

Now, if you want to convert all the .jpg files to .png’s as well, you can do this by using mogrify’s -format option like this:

mogrify -format png *.jpg

You can even do these two steps in one single command:

mogrify -resize 40% *.jpg | mogrify -format png *.jpg

So now you can relax and lay back till it’s done. 🙂

#!/usr/bin/pythonmo
One keyboard and mouse for multiple computers running Ubuntu

When you have multiple computers on your desk, it can be very annoying to switch keyboard an mouse each time you want to do something on one of the other computers.
So, you can solve this by just using one keyboard and one mouse for multiple computers without buying a hardware switch.
Synergy is a package, available from the repository that lets you share the mouse and keyboard over a range of different computers.
When synergy is active, your keystrokes will be send to the machine where your cursor is currently positioned.
The cursor will slide from screen to screen just as if you are working on one single system with multiple screens attached.
As far as I know, it’s not possible to drag windows from one machine to another. Which would be nice.
So if you’re a programmer and you’re still searching for a useful project, then this is just your bit.

Here is how you can easily start sharing your keyboard and mouse between different computers and screens using synergy on Ubuntu:

First off, install the synergy package and the QuickSynergy packages on each machine you want to use your pointer on with the command:

sudo apt-get install quicksynergy

Note that apt will install the synergy package as it’s required to run QuickSynergy. (QuickSynergy is in fact just a gui for Synergy)
When it’s installed, you’ll find QuickSynergy under the category ‘accessories’ in the application menu.

On the server:

The server is the computer where the used keyboard and mouse are attached to.
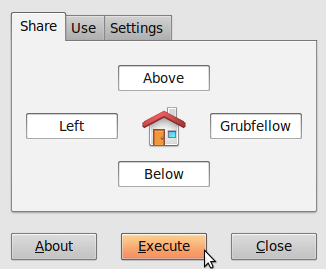
In the Share tab fill in the names of the computers where you want your keyboard and mouse to be operational.
Do not fill in the IP address, it won’t work.

Synergy server

To find out the name of your computer(s), open a terminal and type:

hostname

If all the hostnames are put in the right place, start the service by clicking ‘Execute’
Note that the window becomes gray.
You can now just minimize it and let it do it’s work.

On the client:

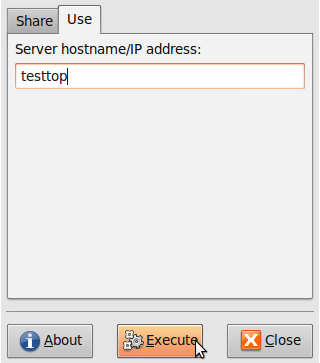
On the Client, fire up the QuickSynergy app and go to the Use tab.
Fill in the hostname of the server.
Note that you can also enter its IP, but know that when you’re using dynamic IP adresses, you’ll have to reconfigure this each time you fire up Synergy.

Synergy Client

Then just hit execute and minimize the window.
Now you can remove your keyboard and mouse from this computer.

When moving the mouse outside the window to the side you’ve configured the other computers position on the server, you’ll see your pointer go ‘troug’ the space between the two computers and appear on the other screen.
Als handy to know is that the clipboard is shared.
So you can actually copy something on machine 1 and paste it on machine 2. (text that is, don’t try this with data)

Note:
Synergy uses an unencrypted TCP/IP stream on port 24800. So if you’re on a network you can’t entirely trust, don’t use it unless you encrypt it.
I would even recommend ALL users using a wifi-network to encrypt the connection.
To Encrypt the Synergy data, you can simply follow the guide on their website.

The guys from Gentoo did it again!

Lots of hardcore hackers use Gentoo as their favourite distribution.
Mind to interpret hackers in the correct way!
This results in the a very strong technical support base, lots of nice tweaks and awesome hacks.
Sometimes the hacks they release are quite nuts.

What did you think of using the RAM on your Graphics card as swap space or RAM disk?
I wonder how this guy got this idea.
I cant think of a decent purpose for this.
Doesn’t matter… this hack is awesome!

Tips: GRUB

GrubGRUB is one of the most common used bootloader on linux.
So, when using linux, and you’re a bit interesting in ‘what’s under the hood’,  it’s the first thing you want to learn about.

When you turn on your computer, the bios will start the bootstrap procedure from the primary boot-device.
(If you’re planning to run a LiveCD, you might make that your CD/DVD-rom drive) 😉
A bootstrap is in fact nothing else than having a small program, so that this can load a bigger one.
That’s the thing GRUB does, in short!
What you should remember, is that it’s important, and you would not like to break it.
If you do, you’ll render your hardisk unbootable.

So the first thing you want to do, is back up your MBR!
Why not just GRUB?
The MBR is a 512-byte segment, the first sector, on your harddisk.
GRUB takes 446 bytes, the partition table takes 66 bytes
and the 2 remaining bytes are for a signature.
You might want to keep these 3 intact.

Continue reading Tips: GRUB